
I created a 3-step card a couple of posting back HERE.
 |  |
The card was only 4 1/4" x 6" in size. I made it smaller than my usual size--which is 6-inch square--because I was going to use only one Mini Magnolia image on the card front. I thought the 6-inch square card was to large for it unless I heap all kinds of embellishments on it--more than I already did...LOL.
Anyway, I was asked to do a tutorial on it (Donna, this is for you), so here goes...
Materials required
2 pieces of cardstock 8 1/2" x 6" each
4 1/8" x 5 7/8" designer/patterned paper to decorate the front
8 1/2" x 6" designer/patterned paper to decorate the inside
Other materials to finish decorating as you desired, eg. coloured images, flowers, ribbons, bows, pearls, etc.
Templates for the 3-step card


And woo-hoo...this old gal has used the little grey cells in her head and has figured out how to put PDF's in her blog post...LOL.
3-Step Card (front cover) template ( I know you don't really need this one...tee he he)
3-Step Card (inside card) template
3-Step Card (front cover) template in centimetres
3-Step Card (inside card) template in centimetres
For those of you who need step-by-step instructions, here they are...
INSTRUCTIONS
Step 1
Score an 8 1/2" x 6" cardstock midway at 4 1/4" and fold. This is for the front cover. Put aside.


Step 2
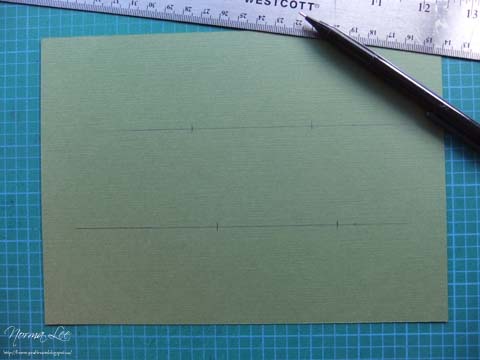
On the other 8 1/2" x 6" cardstock, pencil-draw horizontal lines at 2" and 4" from the top.
On the first horizontal line, mark at 3 1/4" and 5 3/4".
On the second horizontal line, mark at 3 3/4" and 6 1/4".
Step 3
Using a ruler and a craft knife, cut between the 2 marks at each horizontal line (shown as white dashes below).

Step 4
Score at 2 1/4" from top to bottom.
Score at 5 1/4" from top to 1st horizontal line.
Score at 5 3/4" from 1st horizontal line to 2nd horizontal line.
Score at 6 1/4" from 2nd horizontal line to bottom.

Step 5
Turn the paper upside down and
Score at 5 1/4" from top to 1st horizontal line.
Score at 4 3/4" from 1st horizontal line to 2nd horizontal line.
Score at 4 1/4" from 2nd horizontal line to bottom.

Step 6
Create valley and mountain folds where indicated on template. This is the card inside.

Step 7
Apply glue as show below.

Step 8
Adhere the card inside to the front cover.

Step 9
This is the easiest way I can think of of explaining how to cut out and trim your designer/patterned paper to decorate the inside of your card.
Draw the cut and score lines shown on the template on your designer/patterned paper.

Step 10
Using your ruler and craft knife, trim away about 1/16" for the outside paper edges and both sides of every drawn line, a shown below.

Step 11
Apply glue to the back of each piece and adhere to card inside as shown.


Step 12
Apply glue to the back of the 4 1/8" x 5 7/8" designer/patterned paper and adhere to card front. And voila!...you're done.

Now you can finish decorating your card with coloured stamped image(s) and embellishments as you desired.
(Taking a detour here to work on another card. I will post the end result of this one when I get around to finishing it...LOL.)
Have fun with this!

Wonderful card, and TERRIFIC Tutorial Norma, I so appreciate you doing this!!! I hope to make a card using or following your directions tomorrow.
ReplyDeleteTHANKS for everything.
Big Hugs
Donna
This is awesome Norma, I'll have to have a go at this one ,when I get 5 minutes spare, Great tutorial
ReplyDeleteHugs Julie P
wowww this is allsome, looks like its not so difficuld, a will try it thanks dear xx
ReplyDeletewhat a great tutorial. thank you for sharing. hugs! Mojca
ReplyDeleteWow Norma. Stunning, and such a good tutorial. DebbieX
ReplyDeleteLoved the card and a Great Tutorial to go with it! Thanks for sharing!
ReplyDeleteGreat folding technique, and lovely colors, papers and images. :)
ReplyDeleteHugs, Anne.
Thanks to the tutorial !
ReplyDeleteLove your card - have to try your guideline sin the very near future !
:-) Nina
Oh my gosh, this card is flippin' awesome!Thanks so much for sharing the tutorial. You are the Best!
ReplyDeletegorgeous card! love your tutorial, gonna try it!
ReplyDeletexx
cordine
Merciiiiiiiiiiiiiiii pour ces supers explications et ce gentil partage, Bonne journée
ReplyDeleteJ'adore cette carte,elle est magnifique !
ReplyDeleteI love this card she is lovely !
Merci beaucoup pour le tuto
Thank you very much for the tuto
A very good Tutorial ! Thanks a lot
ReplyDeleteGreetings from Austria
Helga
beautiful card, if I make one I'll be sure to send the folks to your blog.
ReplyDeletewonderful explanation. I thank you all the time you took to put it on pics. It's so lovely.
ReplyDeleteThank you for these wonderful directions!! Can't wait to try making some!!
ReplyDeleteThanks for the tutorial Norma :)
ReplyDeleteHere is my card: http://snuppisblogg.blogspot.no/2013/12/julepost-til-deg.html
Wat een prachtige kaart.
ReplyDeleteBedankt voor uitleg
Groetjes Margreet
Hi Norma. This card is amazing and you are amazing. Thank you so much for going to all this work for those of us who are not as creative as you. This tutorial might help me to look half as amazing as you are....thanks again.
ReplyDeleteHi Norma, Thanks so much for your easy to follow instructions, I've been looking for ages for ones for this card. I haven't used it yet but come the weekend, look out!!!! You're amazing.
ReplyDeleteThank you, for teaching how to create greeting cards. I really loved your greeting card design. If anyone required professional creative they can check Printstop.
ReplyDelete